
We’ve all seen it: vinyl siding that looks wavy, uneven, or is pulling away at the corners. These issues aren’t a sign of a bad product; they’re almost always the result of small, avoidable installation errors. Nailing panels too tightly or failing to leave room for the material to expand and contract can ruin an otherwise perfect home renovation. This guide is designed to help you steer clear of those exact pitfalls. By following these comprehensive vinyl siding installation instructions, you’ll learn how to properly prep, measure, cut, and fasten your siding for a finish that is not only beautiful but also built to last through Chicago’s toughest seasons.
Key Takeaways
- Prepare Your Walls Before Anything Else: A professional siding job depends on a solid foundation. This means removing old siding, repairing any damage, and installing a weather-resistant barrier to protect your home’s structure.
- Install for Expansion and Contraction: Vinyl siding needs space to move with temperature changes. To prevent buckling, leave a dime’s thickness of space between the nail head and the panel, and maintain a ¼-inch gap where siding meets trim.
- Stagger Seams and Use Proper Trim: For a clean, polished look, always stagger the overlaps between siding rows so they don’t create a visible vertical line. Frame all windows and doors with J-channel first to ensure a weather-tight and professional finish.
Gather Your Tools and Materials
Before you hang a single panel, the key to a smooth and professional-looking siding job is preparation. Think of it like cooking a great meal—you wouldn’t start without having all your ingredients and tools laid out first. Taking the time to gather everything you need ensures you won’t have to stop mid-project to run to the store, which helps you stay focused and get the job done right. A well-organized workspace not only saves time but also helps prevent mistakes. From the right saw blade to the correct type of weather barrier, having your materials and tools ready will make the entire installation process feel less like a chore and more like a satisfying project. Let’s walk through exactly what you’ll need to have on hand.
Your Tool Checklist
You don’t need a workshop full of fancy equipment, but a few key items are non-negotiable for installing vinyl siding correctly. Start by making sure you have a good circular saw, preferably with a fine-tooth blade installed backward for clean cuts through vinyl. You’ll also need a sturdy step ladder or scaffolding to work safely at different heights. Grab a reliable tape measure, a level to keep your lines straight, a hammer, and a utility knife for trimming. A snap-lock punch and nail hole slot punch are specialized tools that help create the professional results you see in finished projects. Having these basic tools ready will make every step, from measuring to fastening, go much more smoothly.
Siding Materials and Accessories
Beyond the siding panels themselves, you’ll need a few other materials to do the job right. First, your walls must be a smooth, flat surface. Never install siding directly over open studs. If your wall sheathing isn’t perfectly flat, you may need to address that first. Next, a weather-resistant barrier is absolutely essential. This special layer goes on before the siding to protect your home from moisture. You’ll also need all the right trim pieces, including J-channels to go around windows and doors, corner posts for inside and outside corners, and a starter strip to get your first row perfectly straight. These accessories are what give your home renovation a clean, finished look.
Don’t Forget Your Safety Gear
Working on any home project means putting safety first. When cutting or nailing siding, always wear safety glasses to protect your eyes from flying debris. A good pair of work gloves will save your hands from sharp edges and splinters. It’s also smart to read the manufacturer’s instructions for your specific siding product before you begin. They often contain important safety warnings and handling tips unique to that material. And if you’re working on a ladder, make sure it’s on stable, level ground and always maintain three points of contact. A little bit of caution goes a long way in preventing accidents and ensuring your project is a success from start to finish.
Prepare Your Walls for Siding
Before you can hang a single panel of new siding, you need to get your home’s exterior walls ready for the job. This prep work is the foundation for a successful installation and is a step you absolutely can’t afford to skip. Think of it like preparing a canvas before painting; a smooth, clean, and protected surface is essential for a beautiful, long-lasting finish. Taking the time to properly inspect and prepare your walls will prevent major headaches down the road, ensuring your new siding not only looks great but also effectively protects your home.
This foundational work is a key part of any successful home renovation and involves more than just a quick once-over. You’ll need to remove the old siding, check for any underlying damage, add a protective weather barrier, and ensure the surface is perfectly flat. Each of these steps plays a critical role in the performance and lifespan of your new vinyl siding. Rushing this stage can lead to issues with moisture, pests, and an uneven appearance that detracts from your home’s curb appeal. Let’s walk through exactly how to get your walls in top shape.
Remove Old Siding and Inspect the Walls
First things first, you need a clean slate. Carefully remove all the old siding to get a clear look at the wall sheathing underneath. This is your chance to play detective and inspect for any hidden problems. You’re looking for signs of water damage, soft spots that could indicate rot, and any evidence of pests like termites or carpenter ants. It’s far easier and less expensive to address these issues now than after your new siding is installed. If you find significant damage, it’s wise to contact a professional to assess the situation and make the necessary repairs before you proceed any further.
Install a Weather-Resistant Barrier
Once your walls are repaired and clean, the next crucial step is to install a weather-resistant barrier, also known as house wrap. This material acts like a raincoat for your home, providing a critical layer of protection against any moisture that might find its way behind the siding. The barrier should be installed over the wall sheathing, with the seams overlapped and sealed according to the manufacturer’s instructions. Pay special attention to properly flashing and sealing around all windows and doors, as these are common areas where water can try to get in. This step is non-negotiable for preventing mold and structural damage.
Create a Flat Surface with Furring Strips
Vinyl siding needs to be installed on a flat, even surface to look and perform its best. If the walls of your home are uneven, wavy, or bowed, you’ll need to install furring strips. These are thin strips of wood (or metal) that are attached vertically to the wall studs, creating a level plane for the siding. They effectively bridge any low spots or imperfections in the wall, ensuring your siding panels hang straight and lock together securely. While it adds an extra step to the process, creating a flat surface is essential for achieving that clean, professional finish you want for your home.
How to Measure and Cut Vinyl Siding
Getting your measurements and cuts right is the secret to a professional-looking finish. The old saying “measure twice, cut once” is your best friend here. Taking a little extra time at this stage saves you from frustrating mistakes and wasted material down the line. It’s all about precision and understanding how vinyl behaves with temperature changes. Let’s walk through exactly how to measure and cut your siding panels for a perfect fit that lasts.
Measure for a Perfect Fit
First, always install siding over a smooth, flat surface like rigid sheathing, never directly over open wall studs. When measuring horizontal panels, overlap the factory-notched ends by about 1 to 1-¼ inches. The most important measurement is the expansion gap. You need to leave a ¼-inch space at all openings and where siding meets trim, like around windows. This small gap is crucial because it gives the vinyl room to expand and contract, preventing it from buckling. It’s a key detail in professional home renovations.
Cutting Tips for Different Temperatures
Vinyl siding expands and contracts, so the temperature on installation day matters. If you’re working in weather above 40°F, a ¼-inch expansion gap is perfect. If it’s below 40°F, give the siding more room with a ⅜-inch gap. For long cuts (rip cuts), just score the panel with a utility knife and snap it. For cuts across the panel’s width (cross cuts), a circular saw with a fine-toothed plywood blade works best. Pro tip: install the blade backward for a much cleaner cut without chipping the vinyl.
Use a Snap-Lock Punch for Clean Edges
When you get to the top of a wall, you’ll likely need to cut the final panel lengthwise. To secure this piece, use a special tool called a snap-lock punch. This tool creates small raised tabs along the cut edge of the siding. After cutting your top panel to the right height, use the punch to create these tabs every 8 inches or so, facing outward. These tabs will snap securely into the utility trim at the top of the wall, holding the panel firmly in place without visible fasteners. It’s a simple step for a clean finish, which you can see in our project gallery.
How to Install Vinyl Siding Panels
This is where the real transformation begins. With your walls prepped and your tools ready, it’s time to start hanging the vinyl siding panels. This process is a bit like putting together a puzzle—each piece needs to fit perfectly with the one before it to create a seamless, protective layer for your home. Taking your time here is key to achieving that clean, professional look you see in our project gallery. The first row sets the standard for the entire wall, so precision from the start will save you headaches later. Getting this part right is what separates an average job from a stunning home renovation. We’ll walk through installing the starter strip, hanging the panels, and making sure everything has room to breathe with changing temperatures.
Install the Starter Strip
Think of the starter strip as the foundation for your siding. It’s a narrow strip of vinyl that the bottom of your first siding panel will hook into, ensuring it’s straight and secure. Before you install it, double-check that your wall surface is smooth and flat. You should always install siding over a solid surface like rigid sheathing, never directly onto open wall studs. Once you’ve confirmed your wall is ready, snap a level chalk line where you want the bottom of the starter strip to be. Then, nail the strip along that line, leaving about a ¼-inch gap at corner posts for expansion.
Hang the First Row and Keep It Level
With your starter strip in place, you’re ready for the first panel. This row is the most important one, as it dictates how the rest of your siding will look. Start by sliding the end of your first panel into the corner post. Next, gently push up until you feel the bottom lip of the panel lock securely into the starter strip. You should hear a satisfying click. Once it’s locked in, drive your first nail into the center of the top nailing slot. Don’t drive it in all the way—keep it loose. Continue nailing every 16 inches, always in the center of the slots.
Align and Install the Next Rows
Now you’ve got a rhythm going. For each new row, you’ll follow a similar process. Hook the bottom lock of the new panel into the top of the piece below it. You’ll need to apply a little upward pressure to ensure it snaps in fully along its entire length. This interlocking system is what makes vinyl siding so effective at keeping moisture out. Once the panel is locked in, nail it loosely in the center of the slots, just like you did with the first row. This method keeps everything aligned and looking sharp as you work your way up the wall.
Leave Room for Expansion and Contraction
This might be the most overlooked—and most important—step. Vinyl siding expands in the heat and contracts in the cold. If you don’t give it room to move, it can buckle or warp. First, never nail the panels tightly. You should leave a small gap, about 1/8 to 1/16 of an inch (the thickness of a dime), between the nail head and the siding. You also need to leave space where panels meet trim and corner posts. If you’re working on a day when it’s above 40°F, leave a 1/4-inch gap. If it’s colder than 40°F, give it a bit more room with a 3/8-inch gap.
Overlap and Secure Siding Panels Correctly
Once your starter strip is in place and you’re ready to hang the main panels, the real technique comes into play. How you overlap and fasten the siding is one of the most critical steps in the entire process. It’s what ensures your home is protected from the elements and what keeps the siding from buckling or warping over time. Getting these details right is what separates an amateur job from a professional one.
Properly securing vinyl siding is all about allowing for natural movement. The material is designed to expand in the summer heat and contract in the winter cold. If you pin it down too tightly, you’ll trap that movement and cause wavy, distorted panels. A successful installation creates a durable, beautiful shell that hangs securely on your home while still having the freedom to breathe with the seasons. This attention to detail is a core part of any quality home renovation project.
Get the Overlap and Spacing Right
To create a seamless and watertight finish, you’ll need to overlap each horizontal siding panel. A good rule of thumb is to overlap the panels by about one inch. Just as important as the overlap itself is where you place it. You should never stack your overlaps directly on top of each other from one row to the next, as this creates an obvious and unattractive vertical line on your wall. Instead, stagger the seams by making sure there’s at least a three-foot horizontal distance between the overlaps in adjacent rows. This technique makes the seams far less noticeable and gives your home a clean, polished look.
Center Your Nails in the Slots
Every piece of vinyl siding has long nailing slots at the top. These aren’t just guide holes; they are specifically designed to allow the siding to move. That’s why it is absolutely essential to drive your nails directly in the center of the slot, never at the very top or bottom. Centering the nail gives the panel room to slide left and right as it expands and contracts. If you nail it at one end of the slot, you’ll pin the panel in place, which can lead to cracking or buckling when the temperature changes. For proper support, place a nail every 16 inches for siding panels and every 8 to 12 inches for accessories.
Secure Panels Loosely to Allow Movement
This might feel wrong at first, but you should never drive the nails in tightly against the siding. The goal is to hang the siding, not pin it to the wall. You need to leave a small gap—about 1/16 of an inch, or the thickness of a dime—between the nail head and the vinyl. This tiny bit of space is crucial for allowing movement. After you place a nail, you should be able to slide the panel back and forth slightly. You’ll also want to leave a 1/4-inch clearance at all openings and stops, like where the panel meets a window trim or corner post. Following this installation guide ensures the siding won’t bind and warp.
Work Around Windows, Doors, and Corners
This is where the details really matter. Handling the areas around your home’s features—like windows, doors, and corners—is what separates a standard DIY job from a truly professional one. It requires more planning and precision than installing the long, straight runs of siding, but getting it right is crucial for both aesthetics and performance. A proper installation around these openings ensures your siding looks fantastic and creates a seamless, weather-tight seal that protects your home from the elements.
Before you hang a single panel on the main walls, you need to frame out these features. This involves installing specific trim pieces, like J-channels and corner posts, which act as receivers for the siding panels. Think of it as creating a clean border for a picture; this framework guides your cuts and ensures every piece fits snugly while still having the necessary room to expand and contract with temperature changes. Skipping this foundational step can lead to warped panels and a sloppy finish. Taking your time here will pay off in a polished, durable result that improves your home’s curb appeal. For a look at how these details come together in a complete home renovation, you can see examples of our finished work.
Start with J-Channels and Corner Posts
Your first move should always be to install the inside and outside corner posts and the J-channels around all windows and doors. These trim pieces are the foundation for the rest of your siding. J-channels create a neat, finished edge and a channel for the siding panels to slide into around openings. Corner posts serve a similar function at the corners of your house, hiding the cut ends of the siding for a clean, vertical line. Installing these components first provides a clear guide for measuring and cutting your siding panels, ensuring everything lines up perfectly and looks cohesive. It’s a non-negotiable first step for a professional-grade installation.
Cut Siding for a Precise Fit Around Openings
For a clean fit around windows and doors, you’ll need to make some careful cuts. Using a pair of tin snips or shears designed for vinyl will give you the most control and accuracy. When you measure, remember the golden rule of vinyl siding: always leave a 1/4-inch gap where the panel meets a J-channel or corner post. This small space is critical because it allows the vinyl to expand and contract with changing temperatures. Without this gap, the siding can buckle or warp on hot days, ruining your hard work. So, measure the opening, subtract a half-inch (1/4-inch for each side), and then make your cut.
How to Install Siding on Corners
Once your corner posts are in place, installing the siding is straightforward. Begin by sliding the first siding panel into the channel of the corner post until it’s snug but not forced. Lock the bottom of the panel into the starter strip you installed earlier. When you nail the panel, drive the nail into the center of the nailing slot and leave it slightly loose—about the thickness of a dime between the nail head and the vinyl. Space your nails about 16 inches apart. As you add more rows, overlap the panels by about one inch. To avoid a patterned look, make sure you stagger these overlaps so they aren’t stacked vertically.
Common Siding Installation Mistakes to Avoid
Installing vinyl siding is a project where the details really matter. Even small errors can lead to big problems down the road, like warping, water damage, or a finish that just doesn’t look right. Getting these fundamentals correct is what separates an amateur job from a professional one that protects and beautifies your home for years. A successful siding project is a cornerstone of many home renovations, so taking the time to avoid these common pitfalls is well worth the effort. Let’s walk through the most frequent mistakes and how you can steer clear of them.
Avoid Nailing Too Tightly
One of the most common errors is driving the nails in too tightly. Vinyl siding needs to move freely as temperatures change. If you fasten it too tightly to the wall, you restrict this movement, which can cause the panels to buckle, ripple, or crack under pressure. On the other hand, nails that are too loose can cause panels to rattle or even detach in high winds. The goal is to nail it just right. Drive the nail into the center of the nailing slot, leaving about a dime’s thickness of space between the nail head and the siding. This secures the panel while giving it room to breathe.
Don’t Forget Expansion Gaps
Just as panels need to move horizontally, they also expand and contract lengthwise with temperature swings. Forgetting to account for this is a recipe for warped siding. You must leave a small gap—typically about 1/4 inch—wherever a siding panel meets a corner post, J-channel, or other trim piece. This gap gives the panel space to expand into when the weather gets hot. In colder weather, the gap will be more noticeable, but that’s normal. Cutting panels to fit snugly without this gap will almost certainly lead to buckling when the summer sun hits.
Watch Out for Bad Cuts and Misalignment
Clean cuts and straight lines are essential for both the look and function of your siding. Rushed or sloppy cuts create jagged edges that not only look unprofessional but can also create entry points for moisture. More importantly, make sure every row is perfectly level and that the panels are properly aligned. If one row is slightly off, the error will become more and more obvious as you move up the wall. Use a level on every single starter course and check your work frequently to ensure your lines are straight and your overlaps are consistent.
Never Skip Wall Prep and Moisture Barriers
What’s underneath your siding is just as important as the siding itself. Before you hang a single panel, the wall needs to be prepared. This includes installing a weather-resistant barrier, often called a housewrap. This barrier is your home’s last line of defense against water infiltration, preventing moisture from reaching the sheathing and causing rot or mold. Skipping this step to save time or money is a critical mistake that can compromise your home’s entire structure. Proper planning is a key part of our design and build services, and it should be a key part of your project, too.
Plan Your Installation Around the Weather
When it comes to installing vinyl siding, the weather isn’t just a matter of comfort—it’s a critical factor for a successful, long-lasting job. Vinyl is a type of plastic, and like most plastics, it expands in the heat and contracts in the cold. If you don’t account for these temperature swings during installation, you can end up with siding that buckles, warps, or cracks down the road. This is especially true here in Chicagoland, where we see a wide range of temperatures throughout the year.
Planning your project around the forecast helps ensure the material has the right amount of space to move naturally with the seasons. It also makes the job safer and more manageable for you. Working in extreme heat or cold can be dangerous and can also make the siding material more difficult to handle. A little bit of planning goes a long way in making sure your new siding looks great and performs well for years to come. If you’re ever unsure, working with a professional on your home renovations can take the guesswork out of the equation.
Find the Best Temperature for Installation
The ideal temperature for installing vinyl siding is moderate—not too hot, not too cold. But since projects can’t always wait for the perfect day, manufacturers provide guidelines for different conditions. A key rule of thumb is to adjust the gap you leave at the end of each panel. According to siding experts at CertainTeed, if the temperature is above 40°F, you should leave a 1/4-inch gap for expansion. If you’re working in colder weather below 40°F, that gap needs to be slightly larger, around 3/8-inch, to accommodate more movement when temperatures rise. This simple adjustment is one of the most important steps for a professional-looking finish.
Account for Seasonal Expansion
The most important rule for installing vinyl siding is to give it room to move. Think of it like a floating floor—it isn’t rigidly attached to the structure underneath. Each panel needs to be able to slide back and forth slightly as the temperature changes. This is why you nail the siding loosely in the center of the nailing slots, rather than driving the nails in tight. Forgetting this step is a common mistake that leads to wavy, buckled siding. By giving each panel the space it needs, you ensure your home’s exterior remains smooth and secure through every season.
Stay Safe While You Work
Your safety should always be the top priority. Before you even start, make sure you understand your materials and have read the installation instructions thoroughly. Always wear the proper protective equipment, including safety glasses and gloves. Working in extreme temperatures also poses a risk. In the summer, stay hydrated and take breaks to avoid heat exhaustion. In the winter, be mindful of icy surfaces and dress in layers. Following basic safety tips not only prevents accidents but also helps you do a better, more precise job on your installation.
Add the Finishing Touches
You’re on the home stretch! The bulk of the siding is up, and your house is already looking transformed. Now it’s time for the final details that pull the whole project together. These finishing touches are what separate a good DIY job from a truly professional one. Taking your time here ensures your new siding not only looks fantastic but also performs perfectly for years to come. It’s all about securing the last pieces, giving your work a thorough inspection, and knowing how to keep it looking fresh.
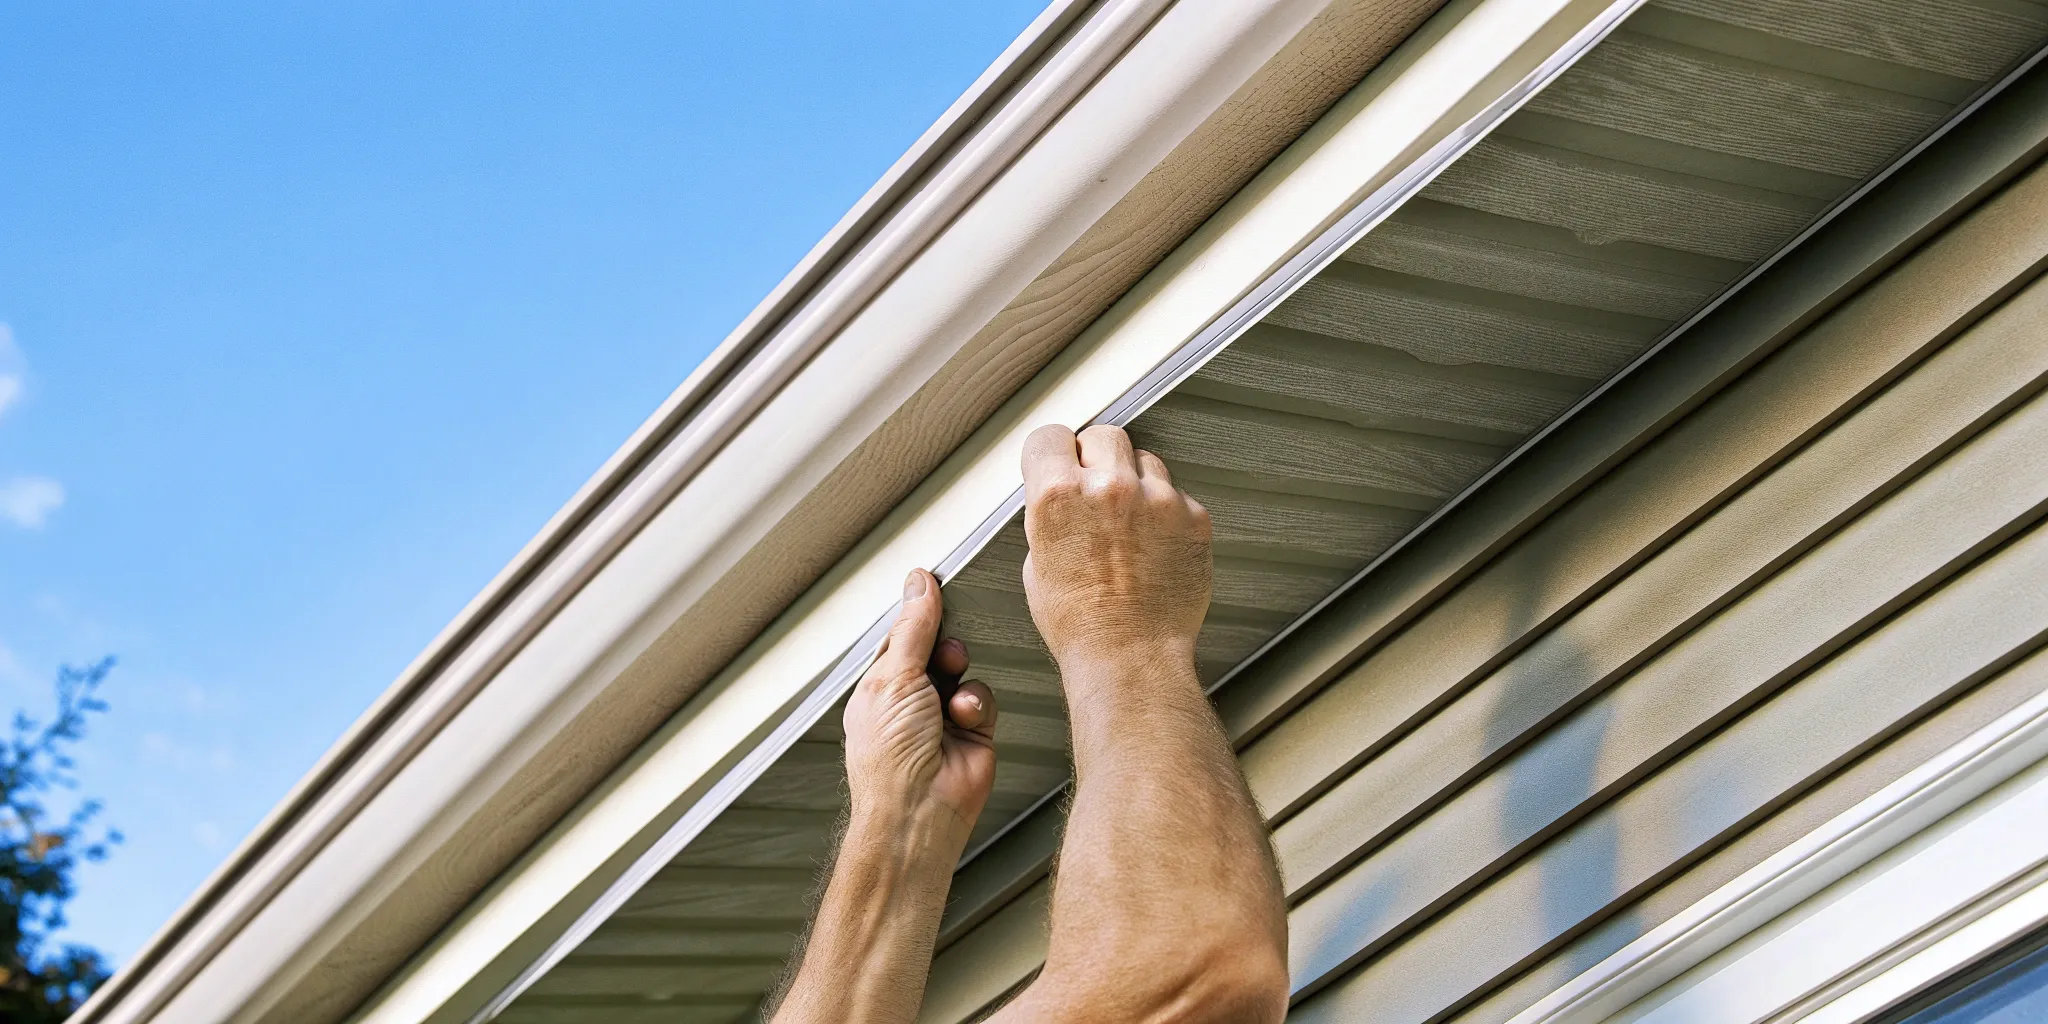
Install Final Trim and Accessories
To finish the top row of siding under the eaves or soffit, you’ll use a piece of utility trim. After cutting the final siding panel to the right height, you’ll need a special tool called a snap-lock punch. Use this punch to create small tabs every eight inches or so along the cut edge, making sure the raised part of the tab faces outward. These tabs will snap securely into the utility trim, creating a tight, clean finish without any visible nails. This final step is crucial for a polished look and ensures the top panel stays put, protecting your home from the elements.
Your Final Quality Check
Before you pack up your tools, take a walk around and give your work a final inspection. Look at the siding from different angles to check for any waves or bulges, which could mean a panel is nailed too tightly. Double-check that all your panel overlaps are consistent and facing away from high-traffic areas. Grab your level one last time to confirm your rows are still straight. Remember, you should be able to slide each panel back and forth slightly. If you can’t, a nail might be too tight. Catching these small issues now will prevent bigger problems down the road and ensure your home has that flawless look you see in our project gallery.
How to Care for Your New Siding
Your new vinyl siding is incredibly durable, but a little care will keep it looking its best. A simple cleaning with mild soap and a soft-bristle brush once or twice a year is usually all it takes to wash away dirt and grime. It’s also a good idea to inspect the siding after any severe weather. Look for any cracks, chips, or loose panels that might need attention. Taking care of small repairs promptly can prevent moisture from getting behind the siding. Proper maintenance is key to protecting your investment and ensuring your home’s exterior remains a source of pride. For any significant damage, our home renovation experts are always here to help.
Related Articles
Frequently Asked Questions
What if my walls aren’t perfectly flat? Installing siding over an uneven surface is a recipe for a wavy, unprofessional finish. The panels won’t lock together properly, and every dip and bow in the wall will be highlighted. The best solution is to install furring strips, which are thin strips of wood that create a new, perfectly flat plane for the siding to hang on. It’s an extra step, but it’s absolutely essential for getting that smooth, clean look you want.
Do I really need to leave a gap when I nail the siding? It feels wrong. I know, it feels completely counter-intuitive to leave a nail loose! But this is the most important rule of vinyl siding. The material naturally expands and contracts with temperature changes. That small gap—about the thickness of a dime—gives the panel room to move. If you nail it down tight, you trap it, which is what causes ugly buckling and warping when the sun comes out. Think of it as hanging the siding, not pinning it to the wall.
Can I install new siding directly over my old siding? It’s a common question, but the answer is that you really shouldn’t. Putting new siding over old siding can trap moisture between the layers, leading to rot and mold that you won’t see until it’s a major problem. Removing the old material also gives you the critical opportunity to inspect your home’s sheathing for any existing water damage or pest issues that need to be fixed first. Starting with a clean slate is the only way to ensure your new siding will last.
What’s the most important specialized tool I need? If you’re going to invest in one special tool, make it a snap-lock punch. This is what allows you to create a clean, secure finish on the very top row of siding under your eaves. The tool creates small tabs on the cut edge of the panel that snap firmly into the utility trim. This holds the final piece in place without any visible nails, giving your project a polished, professional look that you can’t achieve otherwise.
How do I know if I’ve nailed a panel too tightly? There’s a simple test you can do as you work. After you’ve placed a few nails in a panel, try to slide it gently back and forth with your hands. The panel should be able to move horizontally about a half-inch or so within the nailing slots. If it’s completely stuck and won’t budge, your nails are too tight. Back them out just a little until the panel can move freely.